Lateral Image Test
Overview Computations Setup
Baldwin On LIT Contact

LIT Setup

Tester Overview

Initial One Time Alignment:

  1. Using a tripod (4x5 camera tripod works well), Align the Testers Longitudinal Axis (6 inches of travel) parallel to the optical axis.
  2. Without moving anything else, align the Testers Camera Mounting Plate perpendicular to the optical axis and lock it down.
  3. Without moving anything else, aim the Testers Alignment Laser to the center dot of the mirror and lock it down.

Subsequent Testing:

  1. Rotate the Tester on its tripod aiming the Alignment Laser at the center of the mirror.
  2. Then rotate the mirror so as to aim the reflected laser beam back to the Target Cards Aiming Spot.
  3. Aim the Alignment Laser to the center dot of the mirror. As a result, the Longitudinal Axis is now parallel to the optical axis and the Camera Mounting Plate is now perpendicular to the optical axis.
  4. Turn off the laser and turn on the Testers Diffused Led Source. Place the Knife Edge (KE) over the Source and inspect the mirror for smoothness. No more endless hunting for the mirrors reflected beam.
  5. Position the Tester at ROC and then move the Tester back on the Longitudinal Axis a distance as determined previously to fill the CCD with the Reflected Slit Images.
  6. Remove the KE and mount the Source Slits. Attach the Camera, to the Tester, and place the Mask over the mirror. Attach the eyepiece to the Tester.
  7. View the Reflected Slits through the eyepiece. Make small adjustments to position The Center Reflected Slit just over the gap in the Source Slits, and then take a 25 to 30 second exposer, capturing the Reflected Slit Images.
  8. Process Reflected Slit Images using ImageJ's Center of Mass function.
  9. Process ImageJ's Center of Mass results with the LIT Conic Spreadsheet, computing the Foucaults.

Elapsed time less than 30 minutes - Start to Foucaults.

Aligning the Testers Longitudinal Axis to the Mirrors Optical Axis:

  1. Mount the Mask with just the center hole open over the mirror.
  2. Mount the Source Slit.
  3. Observe the reflected slit with a 10 mm eyepiece. Rotate the Tripod with the Tester attached horizontally and vertically so as to keep the reflected slit image fixed with respect to the upper mat cutter blades (the Source Slit) while moving the Tester on the Longitudinal Axis almost all the way forward and all the way back.

Once the Longitudinal Axis is aligned, the Tripod should not be moved.

Jeff Baldwin youtube Longitudinal Alignment video
Mat cutter assembly

Aligning the Camera Mounting Plate Perpendicular to the Optical Axis

Attach the Plastic Mirror to the Camera Mounting Plate. Aim a laser pointer through the hole of the Plastic Mirror to the center of the test mirror. Rotate the Upper Part of the Tester (the Part the Camera Mounting Plate is attached too) until the 3rd bounce of the laser strikes the test mirrors vertical center line. Then lock down the Upper Part of the Tester to prevent further rotation.

perpendicular alignment

3 laser bounce

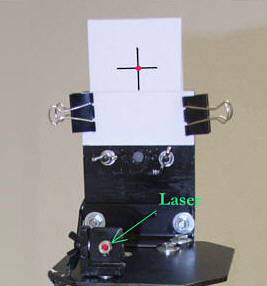
Alignment Laser Aligning and Target Card Aiming Spot

Aim the Alignment Laser at the center dot of the test mirror and lock it down so it can't be move. The tripod can now be moved. But the Upper Part of the Tester (the Part the Camera Mounting Plate is attached too) must remain locked.

To mark the Target Card, mount the KE over the Led Source and then locate the 70% zone. Then mark the reflected Laser Alignment spot on the Target Card.

quick alignment
Mask Mounting Setup
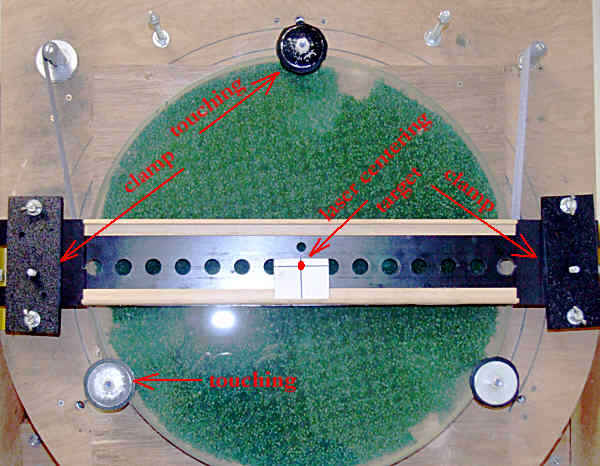
    Mounting the Mask correctly over the mirror is key to Slit Testing. By taking a bit of care initially, Mask mounting can be done subsequently both quickly and accurately - Figure 4.
  • Center dot the mirror.
  • Adjust the strap so that the top of the mirror just touches (using a feeler gauge) the top retaining bolt which is covered with a hard plastic sleeve.
  • Swing the mirror left so as to rest against the left retaining bolt which is covered with a hard plastic sleeve.
  • Aim the attached laser to the center of the mirror.
  • Adjust the mask so that the Laser Center Target (mounted over the center hole) cross hairs intersects the laser beam, making sure the Mask is level.
  • Tighten the left and right Mask clamps.
    Figure 4 Mask Mounting Setup   Mask Mounting Setup  
Subsequent Mask Mounting
   
  • Adjust the strap so that the top of the mirror just touches (using a feeler gauge) the top retaining bolt which is covered with a hard plastic sleeve.
  • Swing the mirror left so as to rest against the left retaining bolt which is covered with a hard plastic sleeve.
  • Mount the Mask.
  • Mount the Cover over the mirror and mask - Figure 5.
    Figure 5 Mirror Cover   Mirror Cover  
    Figure 6 Tester   Tester  
Accessories
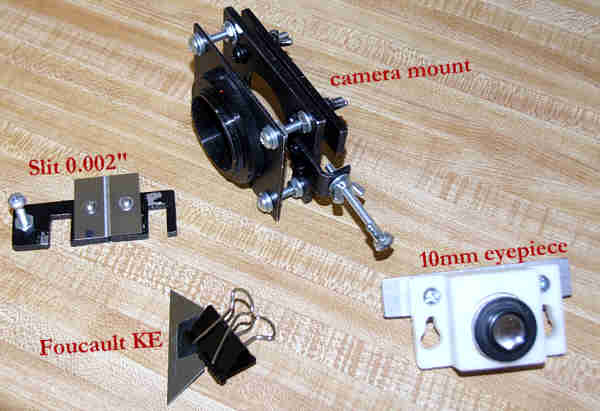
    Figure 7 Tester Attachments   Tester Attachments  
10 mm Eyepiece
    Using the eyepiece adjust the lateral position to center the center slit - Figure 8
    Figure 8 Mounted Slit & Eyepiece   Mounted Slit & Eyepiece  
Camera Figure 9
    Set shutter delay to as long as possible (e.g., 12 seconds) to eliminate camera shake.
Adjust the camera's ASA (e.g., 200) to require longer exposures (e.g., 25 seconds) offers the following advantages:
  • Reduces noise in the image.
  • Suppresses effects of air turbulence i.e., integrates.
    Figure 9 Camera Mouting Plate   Mounted Camera  


References
  (1)  
Karine and Jean-MarcLecleire, A Manual for Amateur Telescope Making. http://www.willbell.com/tm/atmmanual/index.htm
  (2)  Conics
Optical Shop Testing Edited by Daniel Malacara, Wiley and Sons, 1978, Appendix 1 page 479, 482
Conic approximation
Conic equations
Conic constant - Schwarzschild constant
  (3)  LWT

J. Francis, "Improved Test Methods for Elliptical and Spherical TCT Mirrors,", ATM J. 14, 34-39, (ISSN 1074-2697).

Unfortunately, references to the LWT on the Internet have mostly faded away. Jim Burrows author of Sixtests.exe did mention the LWT. LWT was a variant of the moving source Caustic, where instead of trying to determine a Caustic zone holes focus laterally and longitudinally precisely, the LWT measurements were done manually in the same lateral plane and didn't require a mask. Little judgment was required to determine laterally where a zone ray crossed the lateral plane. The LWT was an improvement over the standard Caustic. However, the required lateral accuracy required was very tight. Given small room temperature and the time to take the measurements, I could not get repeatable LWT results.

  (4)  
Lens mount to CCD spacing
   Recommend saving this webpage to your computer, since it has vanished in the past.
  (5)  Dr. Cuffy's Hartmann

Back to the top

Creative Commons License
2005 - 2024 Bill Thomas
This work is licensed under a
Creative Commons Attribution-NonCommercial-ShareAlike
4.0 International License
.